Homework Assignment #0 — Dev Setup
This optional assignment is due Sunday, January 11, at 11:59PM Central time. There are no late days for this assignment: we want you to be on track for starting HW1, which is due soon after!
In CS4278/5278, there is a larger focus on software process, reading code, and using large systems to accomplish tasks. You will be expected to develop programs and scripts in multiple languages using multiple tools. As a result, we want to help you prepare a suitable development environment for the assignments in this course. In our experience, students have reported creating a Virtual Machine to use for the assignments in this class. HW0 is basically a walkthrough for doing just that.
The purpose of this assignment is to help you create a development environment that matches the autograder environment. If you are not familiar with Linux command line tools, this is a great place to start. This assignment is optional, but you must tell us whether you are completing it or not.
If you choose to skip this assignment, let us know by emailing the course staff.
The assignments in this course have been designed around an Ubuntu 22.04 LTS environment. All of the assignments are known to work in this environment. You do not have to use this environment, but you will likely run into issues that are not covered in the spec. For exapmle, different versions of tools and libraries are installed by default in different versions of Linux. As a result, if you deviate from the suggested Ubuntu 22.04 environment, you may encounter corner cases that cause test cases to fail on the AutoGrader. In some cases, the staff may direct you to set up an Ubuntu 22.04 Virtual Machine if you have not done so and are stuck on some assignments. Ultimately, it is your responsibility to read documentation and install supported tools. This HW0 spec is meant to help you walk through the creation of an Ubuntu 22.04 environment.
If you choose to complete this assignment, you should do so individually. You can consult whatever resource you like.
Two options: you pick
There are two options for choosing to complete this assignment:
- Option 1: Set up a local Ubuntu 22.04 Virtual machine on your computer. This is the most popular option for most students. OR
- Option 2: Set up an Amazon EC2 cloud instance with Ubuntu 22.04 running on it. This option will work if you have a slower or older computer. Start early; Amazon takes up to 24 hours to verify cloud computing accounts.
Both options should work with all assignments in this course. Option 1 (local VM) will have you install VirtualBox on your computer, download an Ubuntu 22.04 installation image, and install Ubuntu 22.04 in your virtual machine. A reasonably modern computer (e.g., < 5 years old) should be able to run a VM guest without issue. However, some students report that the VM executes too slowly (e.g., the mouse is laggy, keystrokes are missed, programs take too long). If your VM guest is too slow, you can consider using Option 2 instead (see below).
First, if you are unfamiliar with virtual machines or cloud computing, please read the summary below. Otherwise, you can skip ahead to Option 1 or Option 2.
Virtual Machines and Cloud Computing
A Virtual Machine is an emulation of a computer system. Loosely, you can think of a VM as a program that can run a whole virtual computer system. Virtual machines are powerful software systems that enable running software for one operating system inside another.
For example, you can use your Windows host computer to run a Virtual Machine that contains a Linux operating system. Consider the image below:
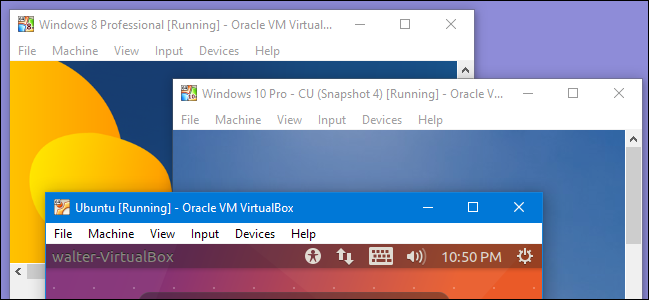
This is a Windows 10 host computer running three different Virtual Machine guests. The guest instances are complete (virtual) environments that are isolated from the host. All of the guests share the host's hardware as they execute — each window in the screenshot above lets you interact with a separate emulated guest.
Thus, even though the host is a Windows computer, you can use one of the guests to execute Linux software inside the guest. Virtual Machines can be used in many combinations. You can have a Windows, Linux, or Mac host computer, and run arbitary numbers and combinations of Linux and Windows guests. Finally, guests are stored as files in the host computer — this means you can move your VM guest from one host to another by transferring the file around.
Option 1: You can choose to set up and run your own Ubuntu 22.04 virtual machine locally. This will allow you complete all of the assignments in this course within the virtual machine. However, some students report that the VM guest runs too slowly (especially if you do not have enough RAM in your computer). If you find that a local VM is too slow, you can proceed to Option 2 instead.
Virtual machines are a critical part of Cloud computing. You can "rent out" computing resources from a company like Amazon EC2 or Microsoft Azure to do whatever computation you might need. Amazon EC2 and Mircosoft Azure both offer you virtual machine guests that run on their hardware. Thus, you can get access to a virtual machine running whatever operating system you like to run a variety of software.
Option 2: If you find that a local VM is too slow, you can instead get a free Ubuntu 22.04 virtual machine from Amazon EC2. Amazon EC2 "Elastic Cloud Compute" is a service that lets you buy and configure virtual machines. Option 2 has you setup and launch an Ubuntu 22.04 cloud instance (this is free if you are a student).
Linux Fundamentals
Many of the assignments are easier to complete on Linux or similar command-line systems. For students who might not be familiar with command-line systems yet, Prof. Kevin Leach kindly shared with us a (long) video he made when he was teaching back in UMich, which provides a gentle introduction to a number of Linux concepts. This video is optional, but you may find it useful if you are less familiar with the Linux environment.
There are timestamps in a comment below the video that contains points of interest, such as:
- terminals
- environment variables
- scripts in the shell
- compiling programs from source
- using ssh
The first half is more about terminals and shells (why do we have to type ./a.out? why can't we just say a.out?), and the second half is more about compiling programs from source. The video also covers elinks in particular, which is a terminal-based browser program.
In the rest of the HW0 tutorial, we adopted the tutorial Prof. Leach created for EECS481 in UMich. In some images, it may show a path named by "eecs481", which should not affect the steps you follow to create your own VM.
Option 1: Local virtual machine
You can set up your own local virtual machine for free. However, before you proceed, consider checking whether your CPU supports accelerated virtualization. If your CPU does not support virtualization extensions, then your VM may run slowly. If that's the case, consider Option 2 for this assignment instead.
You will need:
- A copy of VirtualBox for your operating system. (Windows; Mac (Intel); Mac (Silicon); Linux)
- A copy of 64-bit Ubuntu 22.04 (Download)
VirtualBox
VirtualBox is a Virtual Machine Manager. You install VirtualBox on your host computer (i.e., as a regular program or app). Then, you use VirtualBox to create a virtual machine guest. Once you have created a guest, you install Ubuntu 22.04 inside of the guest. Then, you can start the guest and have a complete Ubuntu 22.04 environment within that guest.
Please note: I only have access to Windows and Linux hosts.
Implications of isolation in VM guests
Note well: Implicit here is that the guest is, to some extent, isolated from the host. This is very important and entails a number of conceptual hurdles if you are not used to virtualization:
- The clipboard is isolated. That is, if you Copy something from your host environment, you cannot paste it inside the guest environment. This is because the VM guest is a completely independent operating system environment from your host.
- Typing and mouse movements have to be captured by the guest.
- If you want to download a file to use in the guest, you must do so from the guest environment. Unless you set up a shared drive (which is not required), you have to download or create files within the guest environment rather than the host environment.
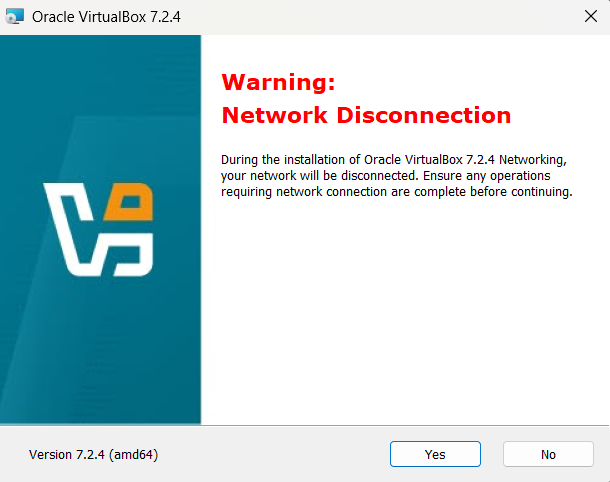
Installing VirtualBox
You can install VirtualBox with the default settings. For your reference, I have included the options I selected during installation below. If VirtualBox says you are missing dependencies for Python bindings, don't worry, you can uncheck that.

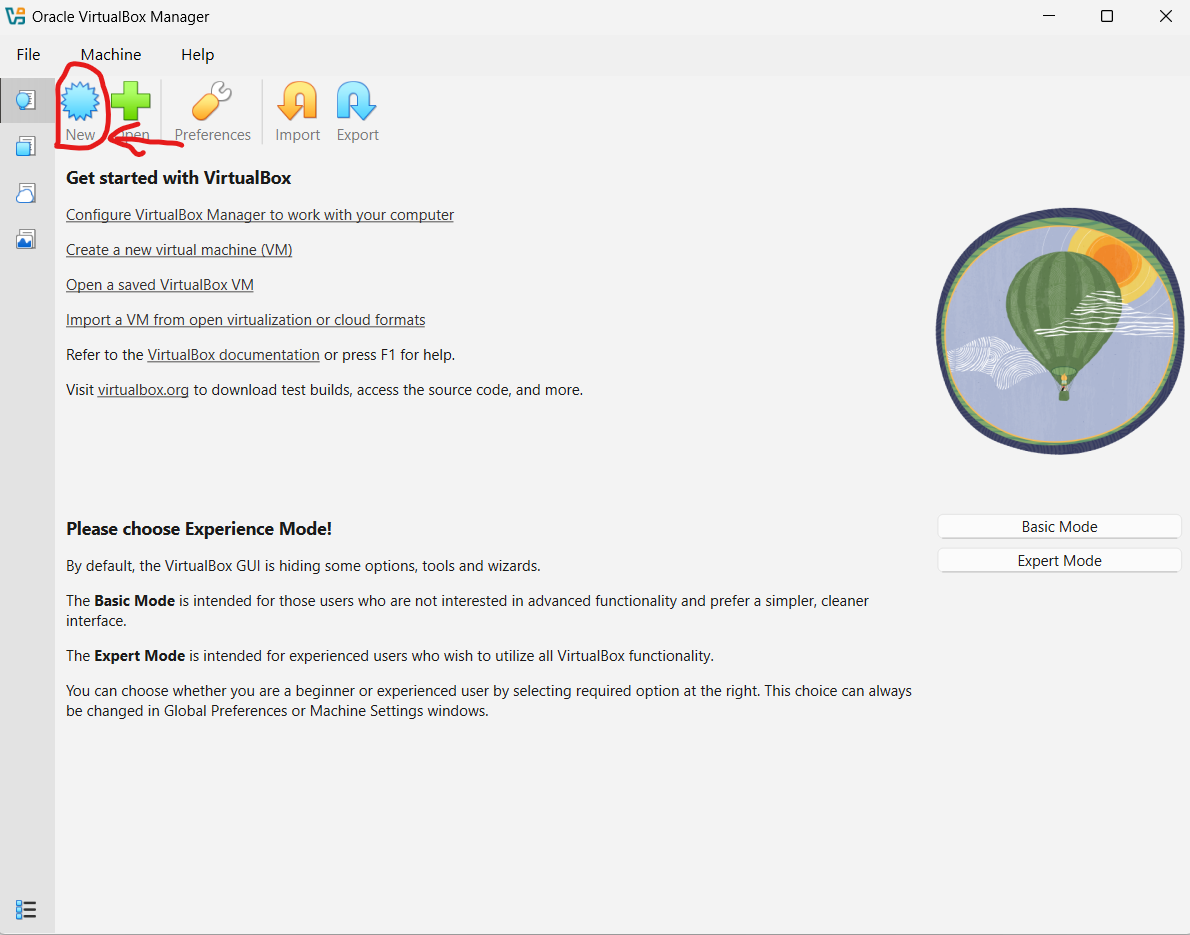
Creating a Virtual Machine
After installing VirtualBox, it will display the main VM Management console, which we can use to create a new Machine:
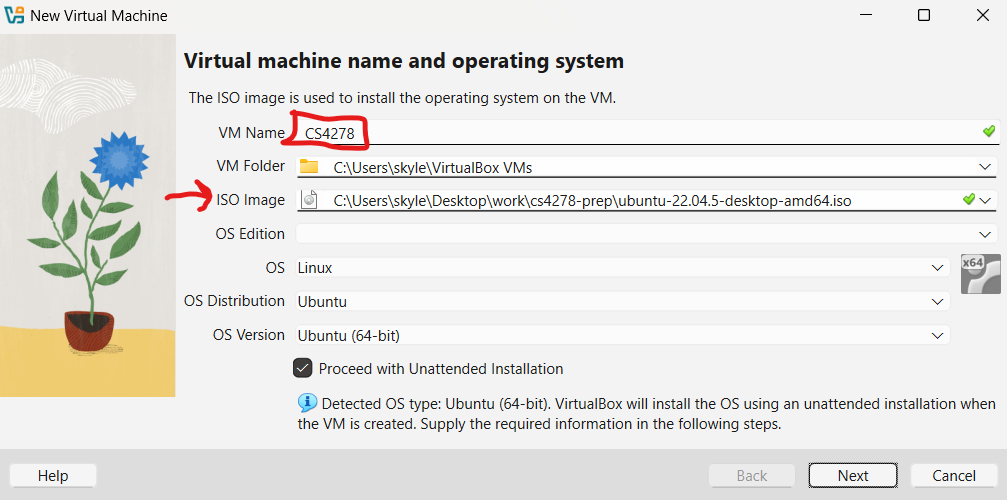
Next, configure your virtual machine. For the ISO image, browse your computer for the ISO of Ubuntu 22.04 you downloaded above. You can name your VM whatever you like:
Next, set up your account information. Select a username and password for your login details and make sure to check Install Guest Additions. This is in an ISO file that should have been placed in the right location when you installed VirtualBox:

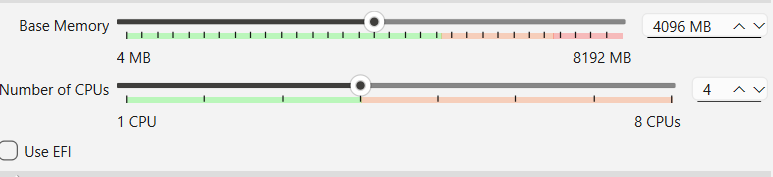
Next, select your base memory. We suggest at least 4096 MB and however many CPUs you want. These next couple of steps may look slightly different for you, just follow as best you can:
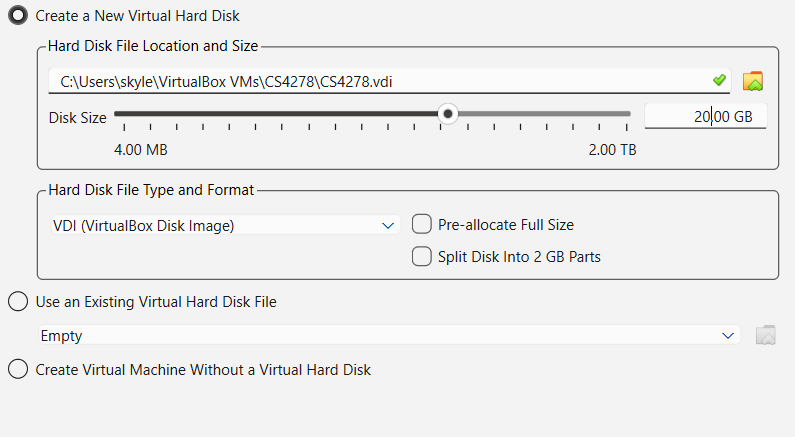
Then it will ask you to create a storage device. Remember, you are creating a virtual machine — an entire simulated computer. That includes simulating a hard disk for storage. This is represented as a large (> 20GB file) on your host computer. I recommend at least 20GB, since the space will be dynamically allocated as long as you don't choose "Pre-allocate full size":
After this step, you will have successfully created a Virtual Machine. Now, you have a bare system with nothing installed on it. Next, we must install an OS on it to run the VM. This will happen largely automatically, but it will take quite some time. If something goes wrong, make sure you have enough memory and storage allocated to the machine in the previous steps.
Remarks on VM usage
While you're running the VM, you may find that it "takes control" of your mouse and keyboard, and you aren't able to leave the window. If this happens, press CTRL+ALT to release control from the VM window. (the keystrokes may be different on Mac OS).
Finishing touches
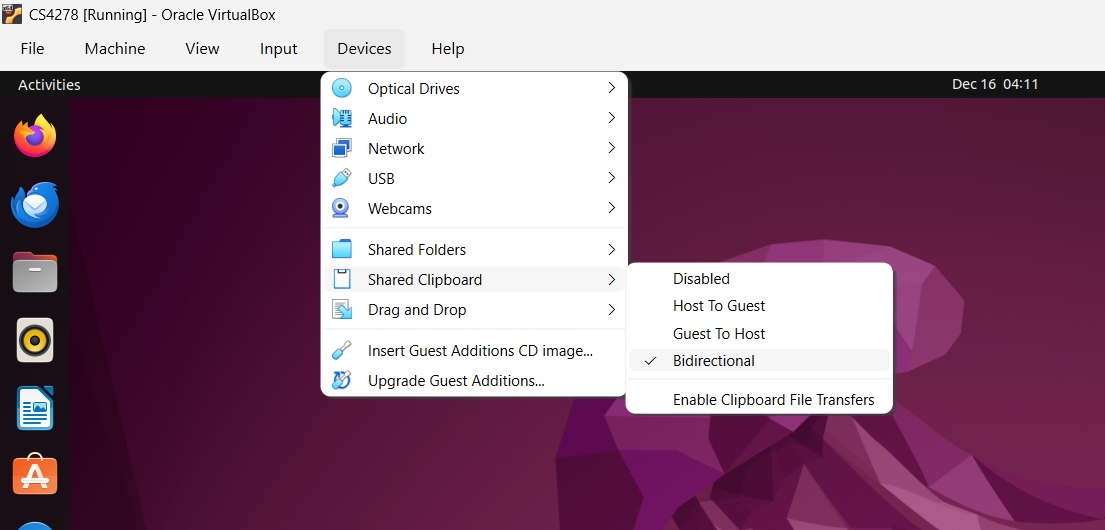
We're almost done! For your convenience, you may want to set up a shared clipboard so you can copy and paste between your host machine and your VM. If you want this functionality, log in to your VM using the account and password you chose when creating the VM and select Devices > Shared Clipboard > Bidirectional:
Next, make sure you set yourself as a sudo user with the following commands. When it prompts you for a password, type in your password that you selected when you set up your VM (the same one you used to log in).
su -
sudo adduser [your username] sudo
After installing, you can reboot the VM image. One more step to make sure gcc is installed in your guest. In a terminal, use:
sudo apt-get update
sudo apt-get install gcc
Now, you'll be all set! You can proceed to Submitting the assignment!
Option 2: Amazon EC2
Note well: This option will take longer than Option 1. Amazon AWS accounts can take up to 24 hours to verify, which means you may have to wait before you can continue to Step 3. Start early!
You will need a Secure Shell (SSH) client. SSH allows you to remotely interact with a server. When you SSH to a remote computer, you have access to a command prompt that runs software on that computer. We will be using SSH to interact with a virtual machine we create in the cloud with Amazon EC2. On Windows, I recommend using WSL to run SSH. You can also use PuTTY. On Mac, you should already have ssh installed. Open a terminal and you can run ssh. On Linux, you can use ssh, but you may need to install it first (e.g., sudo apt-get install openssh or similar, depending on your platform). It is your responsibility to understand how to use SSH, though we give some pointers below.
Amazon EC2 is a cloud
computing service that allows you to rent virtual machines that you
can ssh to and run programs like any other computer.
Amazon offers a large number of cloud-based services all under the
umbrella of AWS (Amazon Web Services). EC2 is a subset of AWS.
In this section, you
will create an AWS account to manage EC2 virtual machines.
You can sign up for a new account on Amazon EC2, and in doing so, you get 6 months of free access to a virtual machine that is enough to complete the assignments in this course. If you do not already have an Amazon EC2 account, navigate to https://aws.amazon.com/ec2/ and click "Create new account" in the upper right.
Complete the sign up process. You may be prompted for credit card information, however you do will not be charged as long as you create only one virtual machine on the free tier. You then will have access to the Amazon AWS Console. If you are prompted, you want to sign in as a "Root" user for the AWS console.
Remarks on AWS Account creation.
Creating a new VM
Now that you have created an account, you can use the AWS Console to help manage and launch virtual machine instances. We will walk you through the steps to create an Ubuntu 22.04 VM below.
(1) Open the AWS Console
After you create an AWS account, you can visit the AWS Console at https://console.aws.amazon.com. At the console, you should be greeted with a large screen full of many services.
(2) Open the EC2 Manager
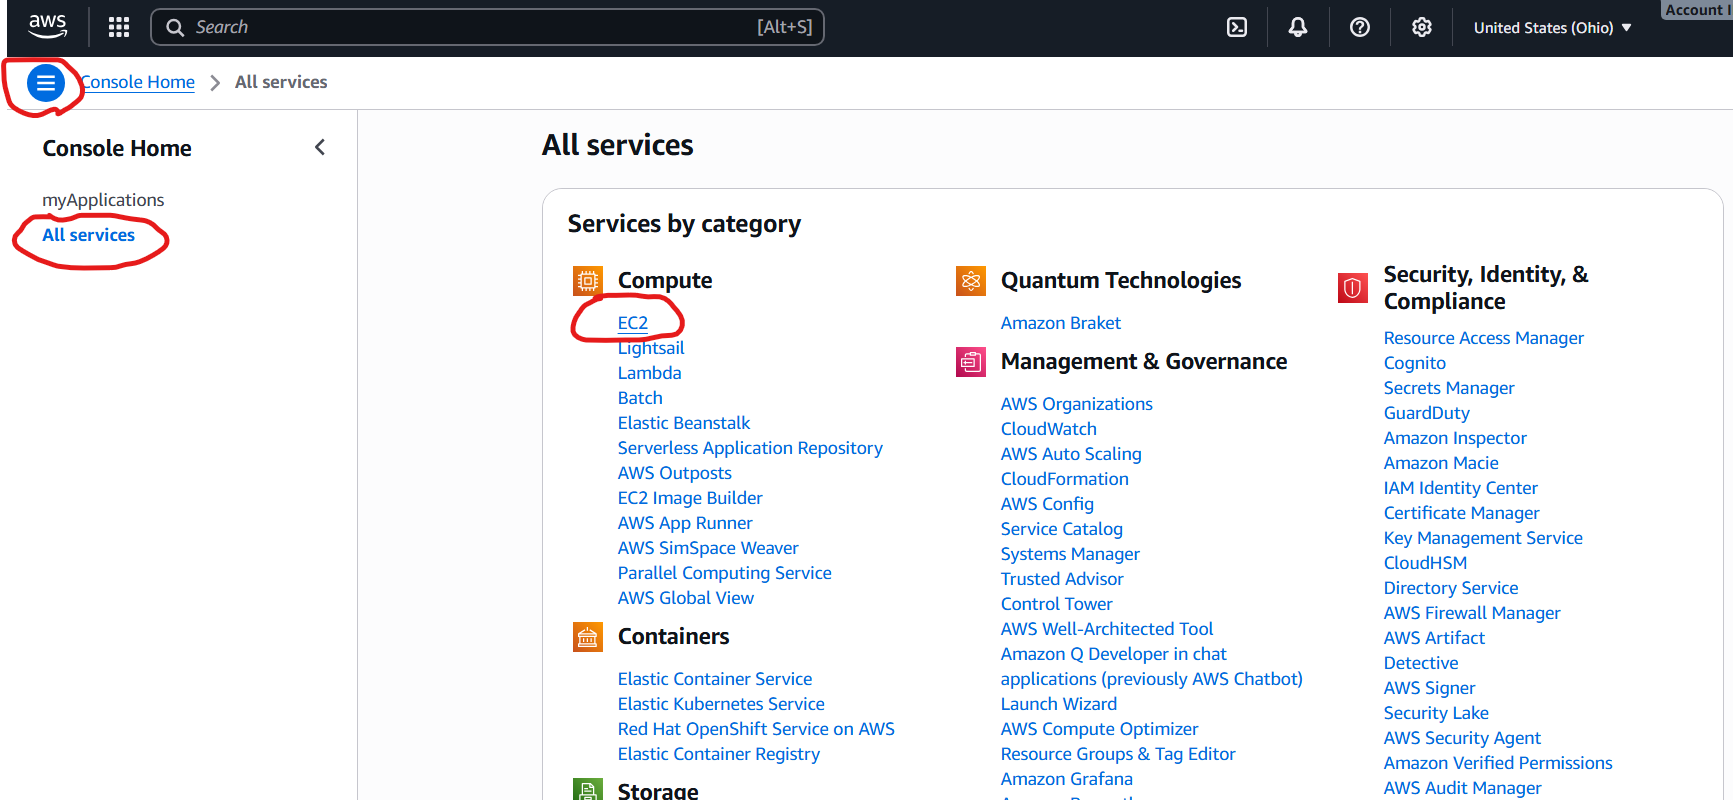
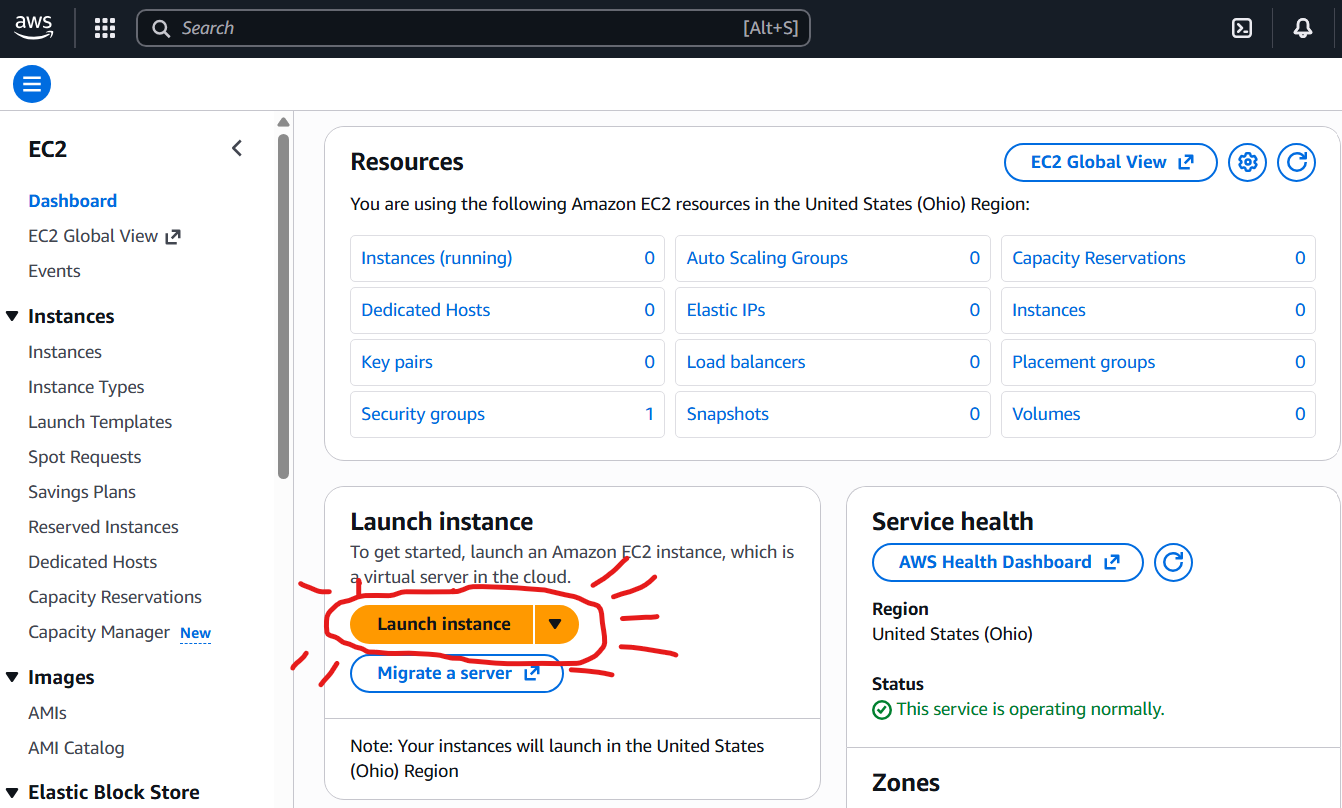
From the AWS Console, click the hamburger menu button in the top left, select All Services and then the EC2 link to open the Elastic Cloud Compute manager. The EC2 Manager lets you manage and launch Instances, which are virtual machines that you configure. The first thing we need to do is configure and launch a new instance.
Click the Launch Instance button.
(3) Choose an Ubuntu 22.04 Instance
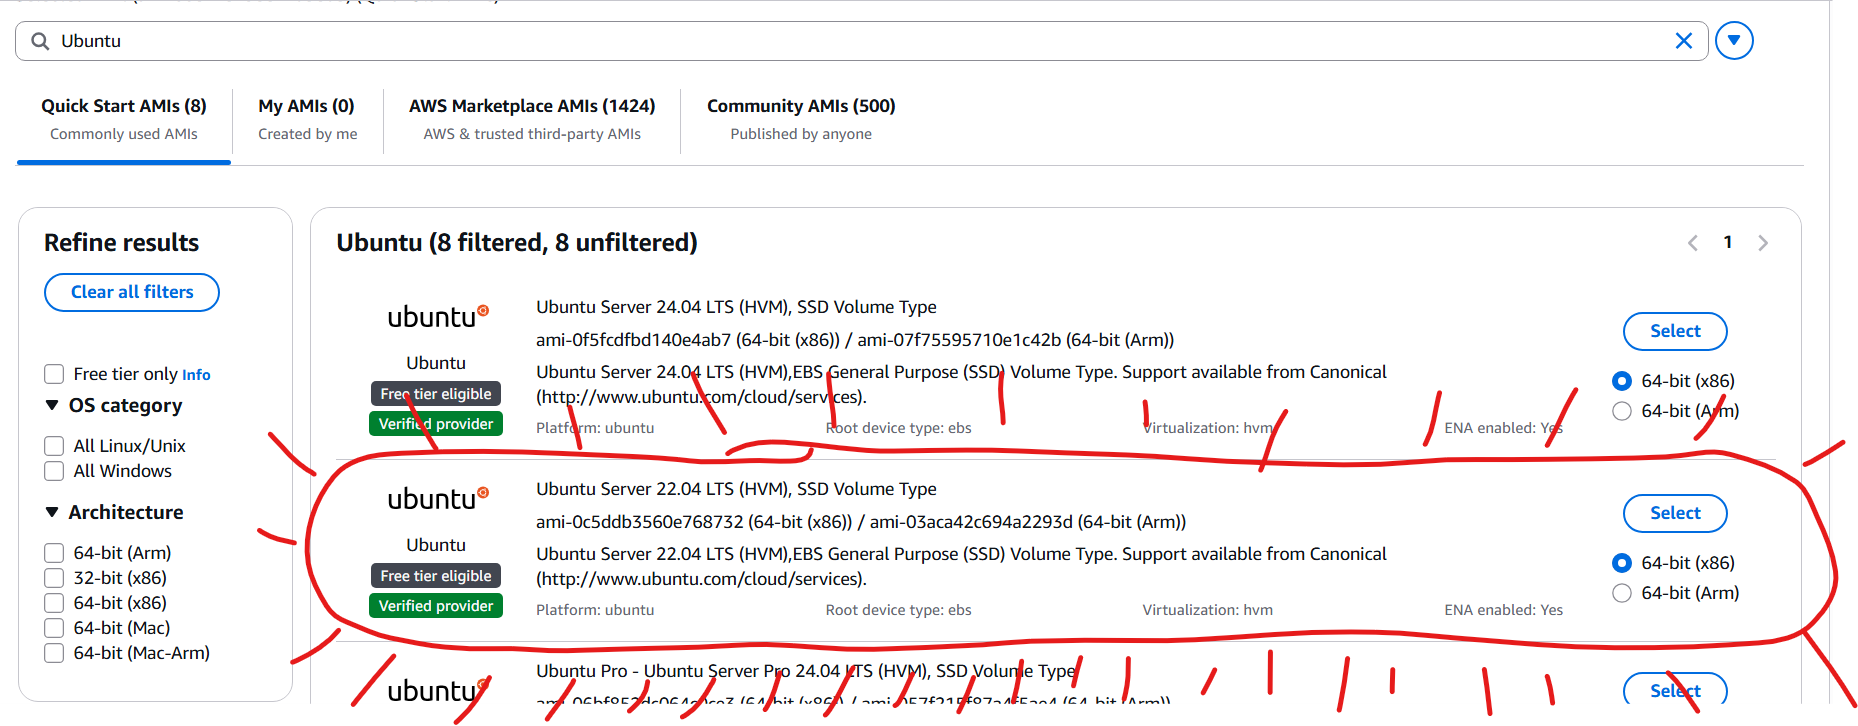
This is the most important step. You must select an Ubuntu Server 22.04 LTS (HVM), SSD Volume Type instance. This is a free tier eligible instance that contains an environment suitable for completing the rest of the assignments. Don't pick other versions of Ubuntu (NOT 20.04 or 24.04, etc.). The AutoGrader uses Ubuntu 22.04, so if you want the smoothest experience, use that version.
On this page, you will see a long list of pre-built virtual machines that you can launch for your own use. We need the Ubuntu 22.04 version to match the autograder setup in this course. See the screenshot below for the exact image we suggest. You should be able to find it by searching for Ubuntu.
(4) Configure your Instance
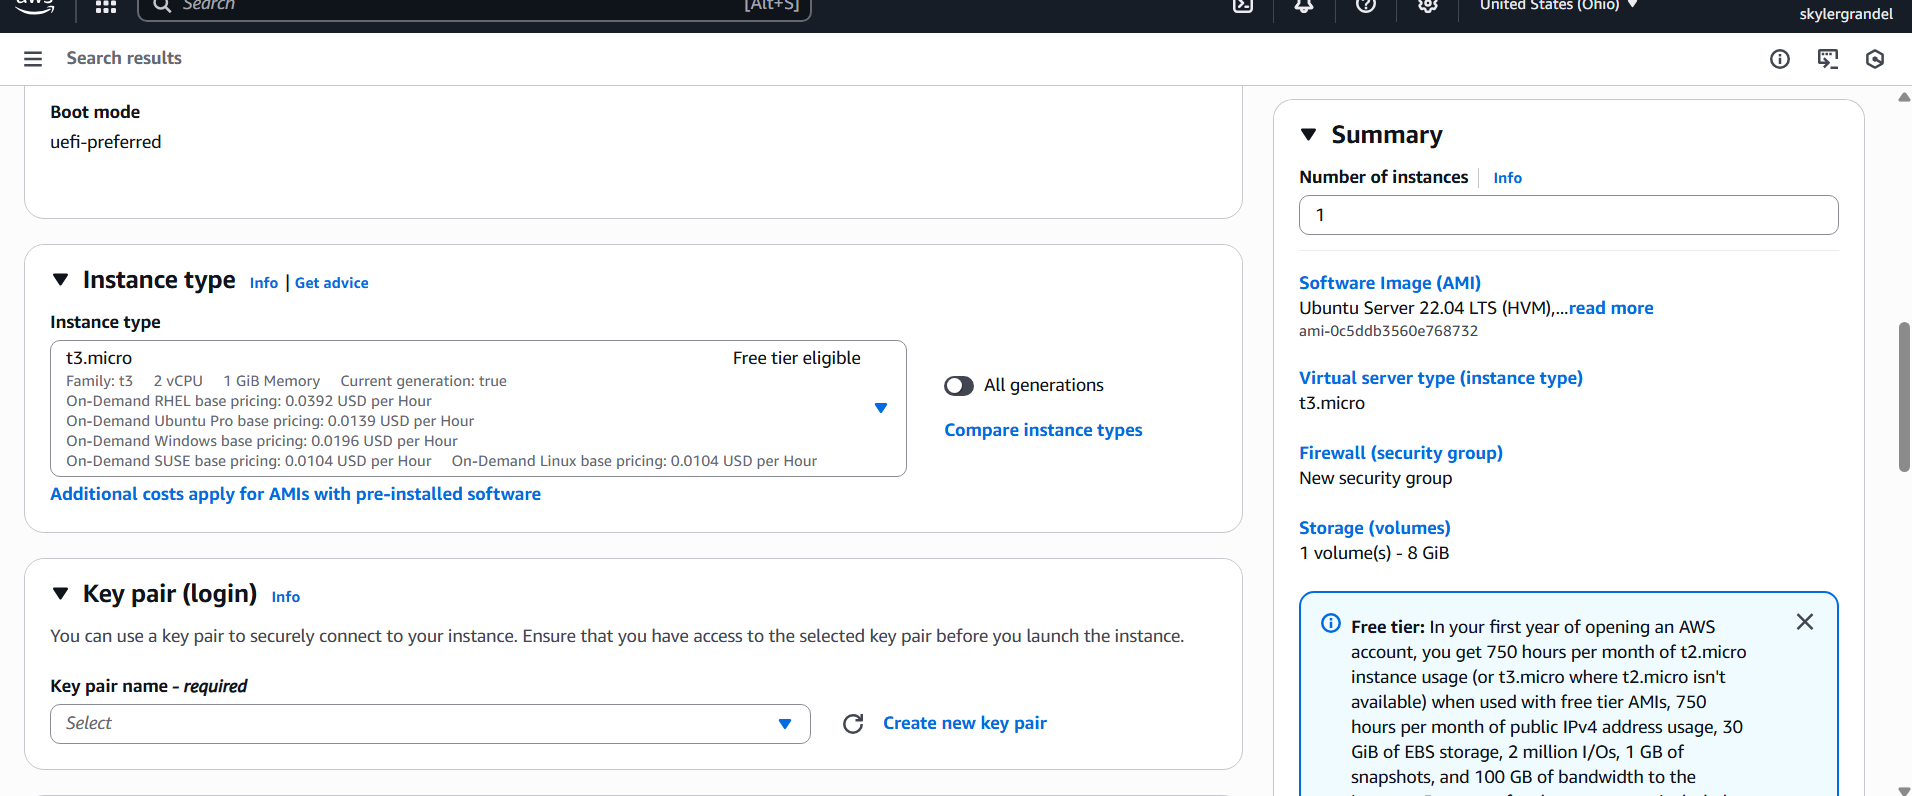
After you select the image to launch, it may ask you a few questions about storage (pick the default if so).
Usually, it will skip ahead and ask you about instance details. You want to pick the free version, called a t2.micro instance. Ordinarily, you could configure resources like (a) how many CPUs, (b) how much RAM, and (c) what type of storage you get on the VM. Just pick t3.micro to get the free level.
(5) Configure Authentication
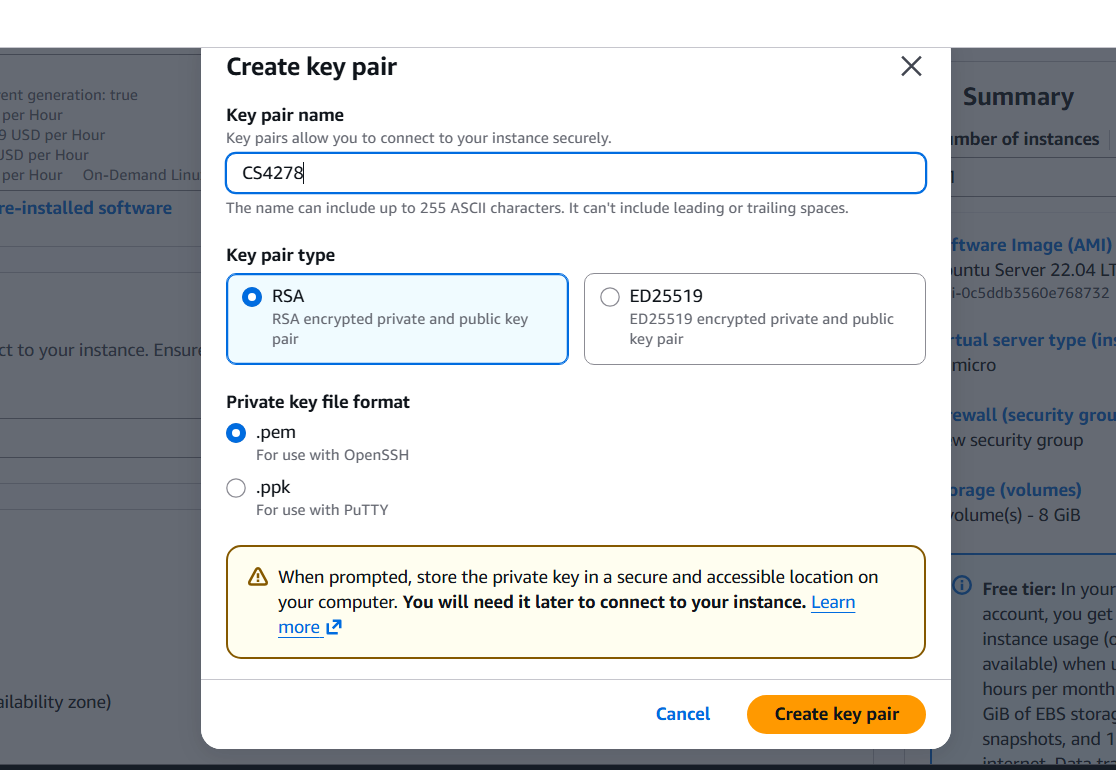
After you set up your instance, you need to create a way to login. This is a tricky security problem because Amazon wants to give you root (Administrator) access to your new instance. The way they do this is by using asymmetric key encryption. Basically, Amazon will let you download a file that serves as your credentials. Rather than entering a password, you will provide this special file to let you login. Take CS 4277 or 6380 for more information about asymmetric key encryption.
Now, you will be prompted to set up credentials for logging in. Select Create a new key pair and type in the name CS4278 and ensure the file format fits with your SSH client (see the screenshot below; key pair type should not matter). Then, click Create Key Pair and download the key pair. It is imperative that you keep this file in a secure location. Do not upload it to GitHub, do not move it around. This is basically like a password for accessing your instance — you wouldn't want someone malicious to access your instance and do something bad with it.
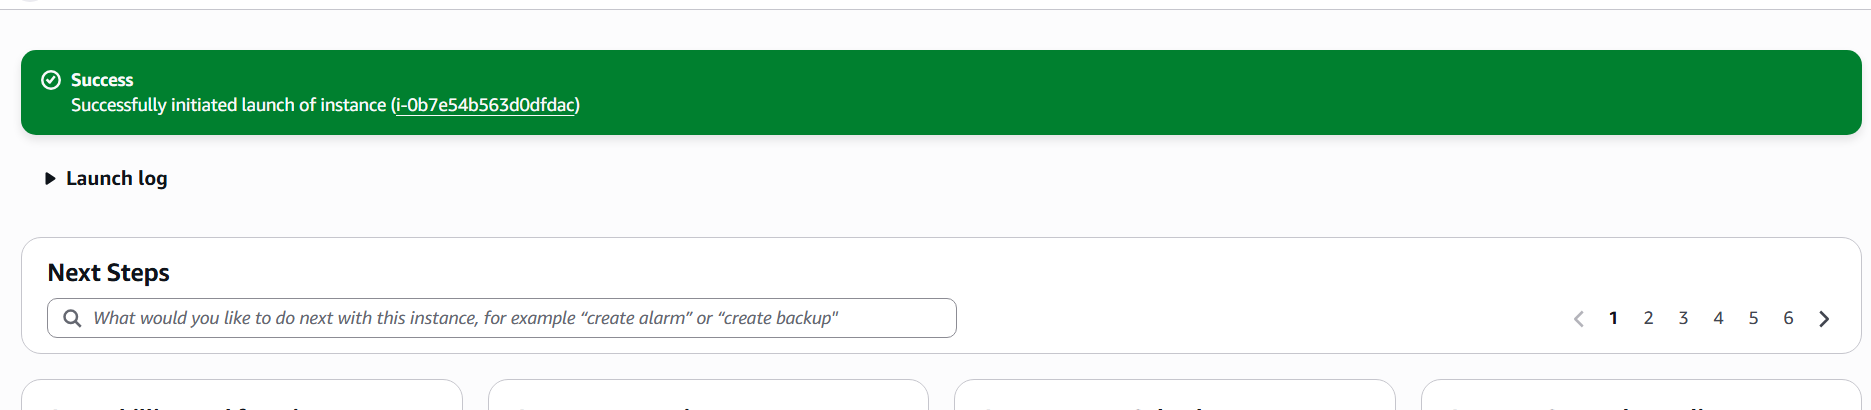
Once you had downloaded your Key Pair, you should be able to Launch your instance. Do so and continue. There is a screenshot below showing what you should see after launching your instance.
Also, from the main EC2 Manager, you can confirm that your instance is running:

(6) Connect to your Instance
At this point, you have set up an Ubuntu 22.04 instance on EC2 and created associated credentials. You now have a virtual machine running in the cloud that you can connect to. You will use ssh to connect to your instance. This is the recommended way — you could technically install a front-end and use remote desktop software, however we strongly recommend using the command line, since you will be using the CLI in many of the course assignments.
From the EC2 Management Dashboard, right-click your running instance. You should see a menu pop up like below:
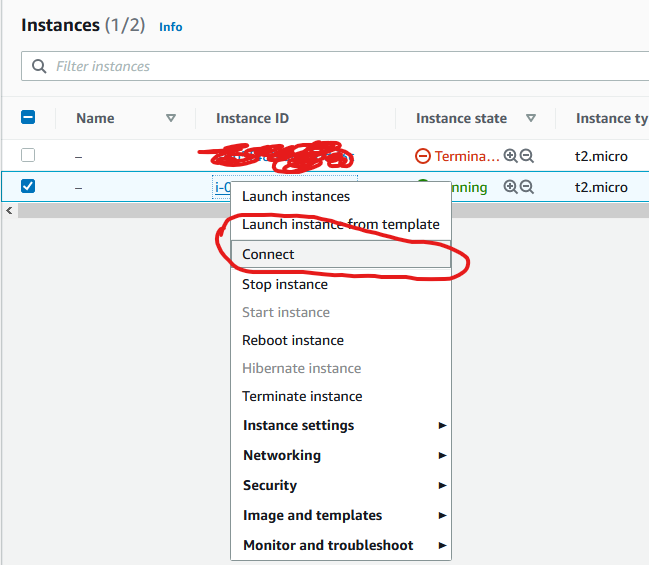
Click Connect. It will pop up a window giving you a number of options. Pick the SSH Client tab to see how to connect via ssh:
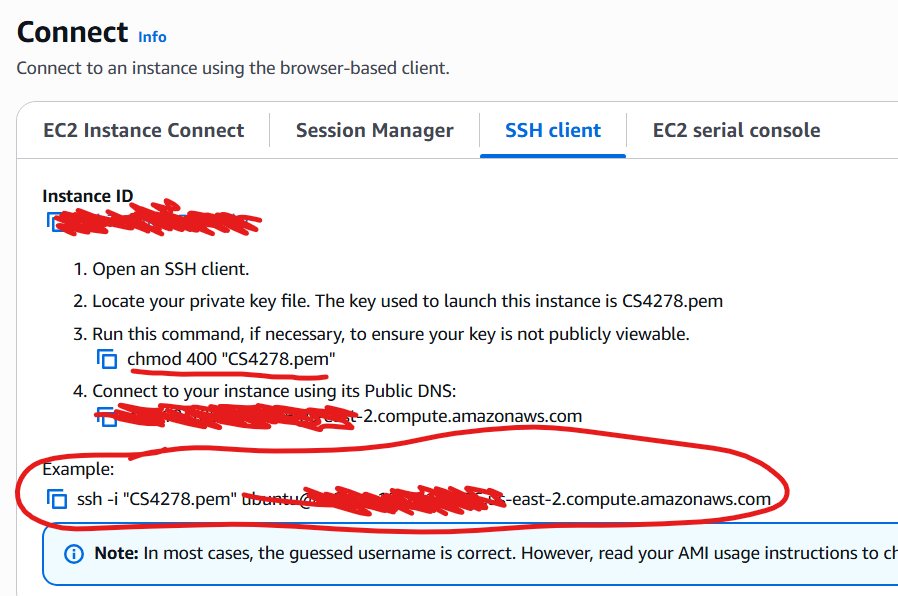
On this window, you will see the hostname of your EC2 instance to which you can ssh, as well as a number of instructions for connecting.
Using Windows WSL to SSH to EC2
If you are using Windows Subsystem for Linux (WSL) to connect to your Amazon EC2 instance, you must prepare your key file before connecting. My recommendation is to run the following:
mkdir -p ~/.ssh/
cp /path/to/your/downloaded/CS4278.pem ~/.ssh
chmod 400 ~/.ssh/CS4278.pem
Windows WSL does not apply Linux file permissions correctly unless you are dealing with files contained within the Linux FS. Moving your key to ~/.ssh/ will allow you to chmod 400 appropriately. The SSH client will not allow you to connect to any server using that key if it does not have the correct permissions.
Recall you downloaded a CS4278.pem file when you set up authentication for your instance (see part 5 above). You must specify this file on your SSH client to connect to your instance.
First, you must provide the correct access permissions to the CS4278.pem file. Usually, this means running chmod 400 /path/to/your/eecs481-w21.pem. Once you do so, you can use the ssh command specified directly.
ssh -i /path/to/your/CS4278.pem ubuntu@<your-EC2-hostname-here>
(You must substitute in the path to your downloaded CS4278.pem file as well as the hostname of your EC2 instance, which takes the form of ec2-X-Y-Z.us.W.compute.amazonaws.com for some values of W, X, Y, and Z.
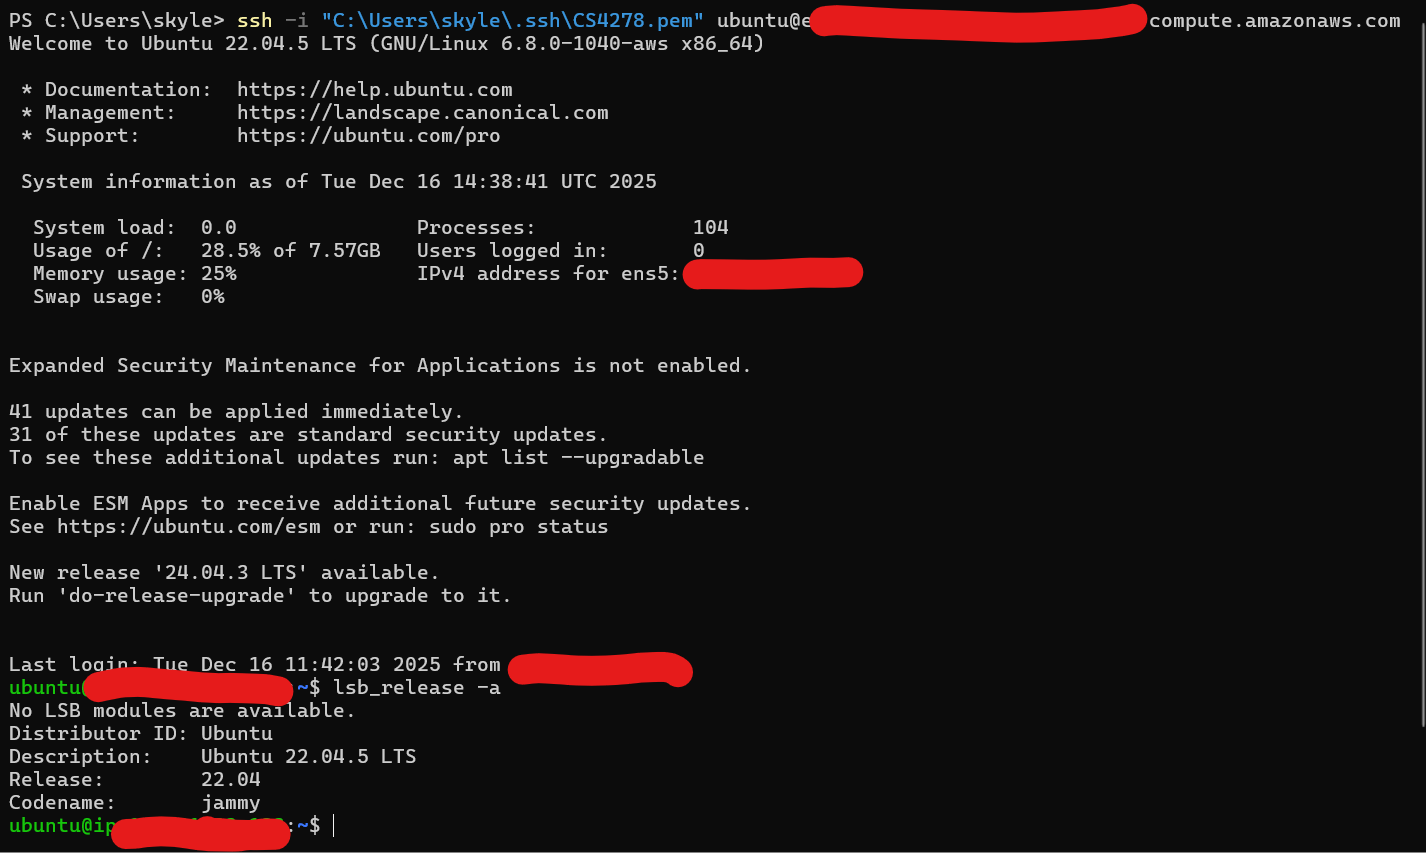
At this point, you should be logged in to your EC2 Instance! See below for an example of me connecting to such an instance from my WSL environment (yes, this is on Windows Powershell, don't worry it should look mostly the same):
Once you're all finished, you need one more step to install gcc:
sudo apt-get update
sudo apt-get install gcc
Then, you can proceed to Submitting the assignment below!
Submitting HW0
Recall, as an optional assignment, you have the choice to skip HW0 if you feel you are adequately prepared for the rest of the assignments in this course. Note well: you are welcome to use whatever environment you like for this course, but you may run into issues this semester with compiling or running some software. Debugging systems integration issues is good practice (and indeed, an intentional part of this courses assignments). Unfortunately, we cannot support every combination of student hardware and software. Thus, the officially supported environment in Ubuntu 22.04.
If you choose to skip this assignment, you must indicate as much by emailing the course staff by the due date.
If you choose to complete this assignment, due so through autograder.io. Under HW0, you are asked to submit a single file named output.txt. Obtain your output.txt file by running the following commands in your virtual machine guest:
cd ~
wget https://dijkstra.eecs.umich.edu/kleach/eecs481/w21/hw0sample
chmod u+x hw0sample
./hw0sample
After invoking ./hw0sample, you will find a file output.txt in your home directory. Upload that file to the autograder and you're done!
What do these commands do?
The file hw0sample is a program I wrote that gathers system information about your environment (specifically, which version of Ubuntu you are running and which version of gcc you have installed). If you followed either of Option 1 or Option 2, you should have an identical environment with Ubuntu 22.04 jammy installed and gcc 5.4 installed. Thus, the output.txt will (mostly) only been correct if invokved on the environment expected by the autograder for the subsequent assignments. If you get full credit for HW0, then you at least have some confidence that you can eventually get the rest of the assignments working as well!
Note well: If you run hw0sample on another environment besides the Ubuntu 22.04 environment described in this spec, then no guarantees are made about the correctness of the file (or whether you can run the program at all). Only run this in your VM.
How do I get output.txt out of the VM?
Note that since you're working inside a VM, you'll occasionally need to move files to and from your VM guest and host. In this case, you have downloaded a program (hw0sample) using the wget utility. This makes a file in your VM guest environment. When you run that program, it creates a new output.txt file in the VM environment as well. But how do you get that file to the AutoGrader?
If you used Option 1 and installed the Guest Additions, you can drag and drop files to and from the VM. Just open up the file manager inside your VM, then drag the output.txt file to a directory on your host. Then you can upload from there.
In addition, with option 1, you can also open Firefox inside of the guest VM and open autograder.io from there! You may find this easier when working on the other assignments: just keep the autograder open in your guest, and upload from there.
If you used Option 2, you can use the scp (Secure Copy) utility to copy files from your EC2 instance.
On your host computer in a terminal, you download a file from your EC2 instance to your host computer:
scp -i /path/to/your/CS4278.pem ubuntu@>your_EC2_hostname<:/path/to/some/remote/file.txt /path/to/where/you/want/to/download/it/target.txt
The command above copies some file.txt to target.txt.
On your host computer in a terminal, you upload a file to your EC2 instance from your host computer:
scp -i /path/to/your/CS4278.pem /path/to/local/file/to/upload.txt ubuntu@>your_EC2_hostname<:/path/to/some/remote/target.txt
The command above will upload upload.txt from your local computer to target.txt on the EC2 instance.
Final Remarks
This course has a fair bit of systems programming in this course. There's a mix of command line tools, multiple languages, and using large projects that you may not have seen, written, or used before. That's the point. In software engineering, a lot of your day-to-day tasks will involve reading code and documentation, and getting things set up to run. I am a big believer that this type of experience is some of the most valuable you can acquire as an undergraduate student — it makes you more productive at other tasks.
This assignment is not meant to take more than 2 hours (excluding the time taken to download Ubuntu 22.04 in Option 1, or the Amazon AWS signup time in Option 2). Please use this assignment as a gauge for your technical preparedness in this course. A big component of the assignments is "read the docs, figure out how to invoke the tools." I acknowledge this is not for everyone — indeed, one purpose of having this (and HW1) due so early is to help you decide whether you like this style of assignment. Please contact us on Piazza if you have any questions!